Category: How-to Tutorials

  • WordPress Multisite installation, step by step

    Key takeaways

    • The install itself is five steps. Almost every reported failure is four layers disagreeing: DNS, web server config, wp-config.php constants, and rewrite rules.
    • Subdomain or subdirectory is a launch decision. Subdomains need a wildcard DNS record and a server that answers wildcard hostnames; switching afterwards is a migration, not a config edit.
    • Replace the entire WordPress block in .htaccess with the generated one. Merging old single-site rules with the new network rules is the classic reason every subsite 404s while the main site works.
    • If a broken subsite shows your host’s branded 404 instead of your theme’s 404 page, the request never reached WordPress. Fix DNS and server routing before touching constants.
    • In a network, only the Network Administrator installs plugins, and network activation is a different state from per-site activation. A plugin written for single-site can fatal every subsite at once.

    Enabling Multisite is one line in wp-config.php, one form in Tools, and two blocks of generated code. Most people get through it in ten minutes. Then the second subsite returns a 404, the admin loops back to the login screen, and the same ten-minute job turns into a day.

    That gap is the whole subject. Multisite spans four layers that have to agree with each other: DNS, web server configuration, WordPress constants, and plugin behaviour. Nearly every reported failure is a disagreement between two of them, not a bug in WordPress.

    It multiplies ordinary problems, too. One network-activated plugin that was never written for a network takes every subsite down at once, so the routine for a plugin that is not working applies across the whole install rather than one site. That is worth knowing before you enable anything.

    Decide whether you need a network before you edit a file

    WordPress’s own Advanced Administration Handbook opens its multisite preparation page with the question “Do you really need a network?” before it gets to any requirements. That order is deliberate.

    Multisite fits sites that belong to the same organisation and share a stack: franchise locations, university departments, regional or language variants of one brand, an internal publishing group, a set of microsites built from the same base theme. One codebase, one update cycle, one hosting bill, shared users where you want them shared.

    It fits badly when the sites are unrelated. The most common regret in practitioner threads is an agency that put a portfolio of unconnected client sites into one network for the convenience of a single dashboard. Shared convenience is shared fate: one compromise, one bad update, one runaway cron job, and everything is affected. Per-site experimentation gets awkward, and offboarding a client means extracting a subsite from the network, which is possible but not quick.

    Two alternatives come up repeatedly and both are reasonable. Separate installs with a management tool across them gives you most of the single-dashboard benefit without coupling anything at the database level. Multi-tenant setups, where one codebase serves isolated sites without WordPress’s network tables, are a different answer to the same cost problem. Neither is Multisite, and neither carries its lock-in.

    A short filter: if the sites will share users, themes and governance for years, Multisite earns its place. If any one site must be able to fail, move host or leave on its own, use separate installs.

    What your host has to support before you touch wp-config.php

    Most failed installs are host capability problems that surface halfway through. Check these first, because finding out afterwards means unwinding a half-configured network.

    • Pretty permalinks already work on the single site. If they do not work now, they will not work network-wide.
    • Rewrite support. On Apache, mod_rewrite has to be enabled or the .htaccess rules are ignored silently. On nginx there is no .htaccess at all and the rules belong in the server block, which means you need either server access or a host that applies them for you.
    • Writable wp-config.php and .htaccess. If the files cannot be saved, the network looks installed and keeps behaving like a single site.
    • Writable uploads tree. Each subsite gets its own directory under wp-content/uploads/sites/. Wrong ownership produces “Could not create directory” on the first media upload.
    • Wildcard DNS, if you are going with subdomains, plus a virtual host or app mapping that accepts wildcard hostnames. Add the record and let it propagate before onboarding sites, or you will misdiagnose intermittent resolution as a WordPress bug.
    • Headroom. A currently supported PHP version, a supported MySQL or MariaDB release, and enough memory and process allowance that network-wide operations do not fail at random.
    • A full backup of files and database, taken and verified before you start.

    Budget shared hosting is where this list gets expensive. Some plans do not expose wildcard subdomains, some do not let you touch rewrite configuration, and a few managed hosts either do not support Multisite or support it with limits on domain mapping. If your host treats server rewrites or wildcard DNS as a special case, that is the answer about whether Multisite is a first-class workload there.

    Subdomains or subdirectories, decided once

    Network Setup asks you to choose, and the choice is not cosmetic. It determines routing, cookie handling, certificate coverage and how domain mapping will work later. You cannot flip it afterwards with a config edit: changing structure after launch breaks URLs and internal links, and the honest path is a controlled migration.

    Subdirectories (example.com/paris/) are the lower-friction option. No wildcard DNS, cookies are simpler to reason about, and your existing certificate covers everything. They suit sites that are genuinely one brand: regional sections, departments, campaign hubs.

    Subdomains (paris.example.com) suit sites that need visible separation or will eventually run on their own domains. They need a *.example.com record pointing at the server, a web server configured to answer wildcard hostnames, and a wildcard certificate, which usually means DNS-based validation rather than the click-through flow you used on the single site. Trying to fake subdomain routing with rewrite tricks instead of fixing DNS is a reliable way to lose a day.

    One thing that surprises people testing locally: if the site runs on localhost, on an IP address, or on a URL that already contains a path, Network Setup only offers subdirectories.

    Running the installation

    The handbook’s Create A Network article walks the same sequence every host guide repeats, from Step 0 “Before You Begin” through Step 6 “Administration”. Here it is with the parts that actually bite.

    1. Back up files and database, and keep a copy of wp-config.php and .htaccess outside the site.
    2. Deactivate plugins. All of them, on an existing site. Security plugins, redirect managers and cache layers interfere with Network Setup often enough that you end up debugging the wrong thing. Reactivate one at a time afterwards.
    3. Add the constant to wp-config.php, above the /* That's all, stop editing! Happy publishing. */ line and not inside any if block or function:
      define( 'WP_ALLOW_MULTISITE', true );
      If that comment does not exist in your file, put it above the first require or include. Placed below it, or inside a conditional, Tools > Network Setup never appears.
    4. Reload the admin and open Tools > Network Setup. Choose the structure you already decided on, check the network title and admin email, and submit.
    5. Paste the two generated blocks exactly as shown, into wp-config.php and .htaccess. Do not tidy them, do not adapt a version from a tutorial, and do not merge the .htaccess block with your old rules.
    6. Log out and log back in. Network Admin appears under My Sites only after a fresh login. “The install finished but there is no Network Admin” is almost always this.
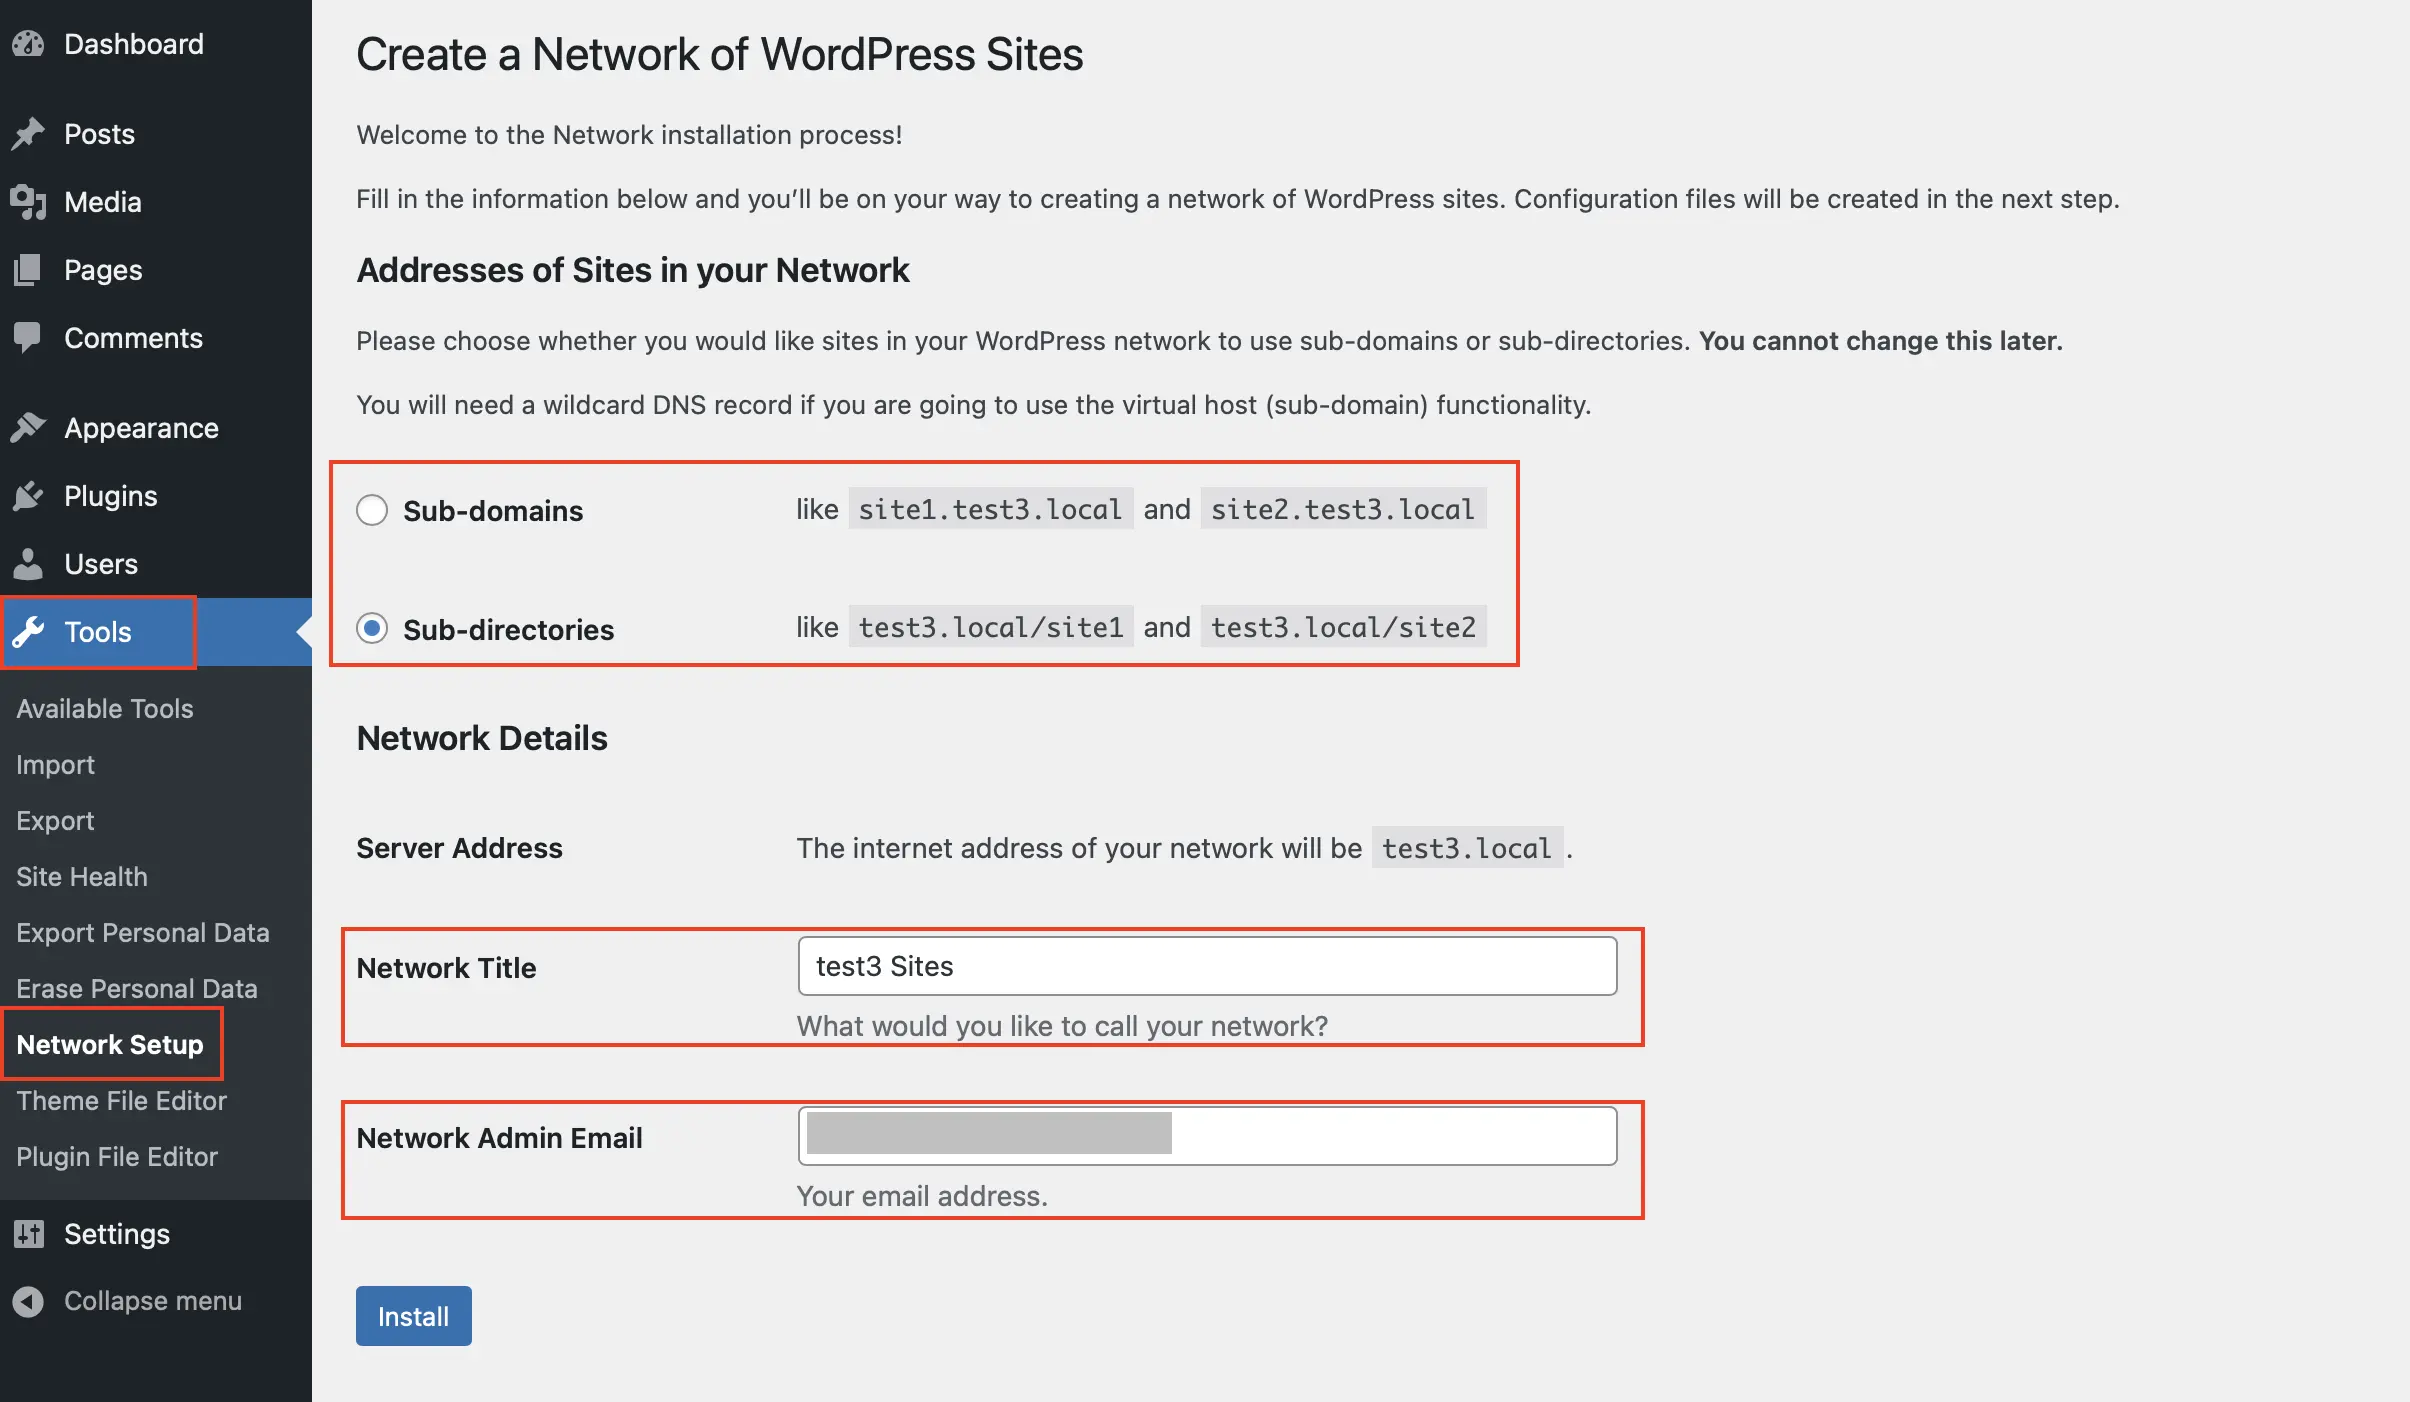
    WordPress Network Setup screen during a multisite installation
    The WordPress Network Setup screen provides the crucial choice between sub-domains and sub-directories, dictating how your network sites will be structured. · Source: www.ionos.co.uk

    On a subdirectory network the generated constants look like this, with your own domain in place:

    define( 'MULTISITE', true );
    define( 'SUBDOMAIN_INSTALL', false );
    define( 'DOMAIN_CURRENT_SITE', 'example.com' );
    define( 'PATH_CURRENT_SITE', '/' );
    define( 'SITE_ID_CURRENT_SITE', 1 );
    define( 'BLOG_ID_CURRENT_SITE', 1 );

    A subdomain network gets the same constants with SUBDOMAIN_INSTALL set to true. DOMAIN_CURRENT_SITE has to match the primary site URL exactly, with no trailing slash and with www. present or absent exactly as the site runs. If you see COOKIE_DOMAIN suggested in a tutorial, leave it out unless you have a tested reason; copied cookie settings cause a lot of avoidable login trouble.

    The Apache block for a subdirectory network replaces the entire existing WordPress section of .htaccess:

    RewriteEngine On
    RewriteRule .* - [E=HTTP_AUTHORIZATION:%{HTTP:Authorization}]
    RewriteBase /
    RewriteRule ^index\.php$ - [L]
    RewriteRule ^([_0-9a-zA-Z-]+/)?wp-admin$ $1wp-admin/ [R=301,L]
    RewriteCond %{REQUEST_FILENAME} -f [OR]
    RewriteCond %{REQUEST_FILENAME} -d
    RewriteRule ^ - [L]
    RewriteRule ^([_0-9a-zA-Z-]+/)?(wp-(content|admin|includes).*) $2 [L]
    RewriteRule ^([_0-9a-zA-Z-]+/)?(.*\.php)$ $2 [L]
    RewriteRule . index.php [L]

    What a correct result looks like

    Before you create real sites, confirm all of this:

    • Network Admin is reachable from My Sites in the admin bar.
    • Settings > Permalinks saves without error on the main site.
    • A throwaway test subsite loads its own front page, not the main site’s, and its admin does not loop at login.
    • A media upload on that test subsite succeeds and lands in wp-content/uploads/sites/2/.
    • Reactivated plugins still behave on both the main site and the test subsite.
    Network Admin sites list in a WordPress multisite installation
    With the Network Admin Sites list now visible under My Sites, your WordPress Multisite network is successfully installed and ready for comprehensive management. · Source: easywebdesigntutorials.com

    If something looks off, do not re-run Network Setup repeatedly hoping for a different outcome. By then WordPress has written constants and database records; re-running on top of a partly configured install adds duplicates to untangle.

    If it did not work, check the layers in order

    The single most useful habit here is changing one layer at a time, from the outside in. Practitioners converge on the same order, for the same reason: each step’s result is then readable.

    1. DNS and host routing. Wildcard record present and propagated, server configured to answer wildcard hosts, mapped domains pointing at the right place.
    2. Server modules and permissions. mod_rewrite or the nginx equivalent, writable config files, PHP version and memory.
    3. The constants from Network Setup, SUBDOMAIN_INSTALL in particular.
    4. Rewrite rules, then Settings > Permalinks > Save Changes on each affected subsite to flush them.
    5. Plugins, deactivated network-wide and re-enabled one by one.
    6. The database, last.

    Two symptoms tell you which layer you are in without any guessing. If a broken subsite shows your host’s branded 404 page, the request never reached WordPress, so the problem is DNS or server routing. If it shows your theme’s 404 page, WordPress answered and the problem is rewrite rules or constants.

    The failures that account for most of it

    Every subsite 404s, the main site is fine. Rewrite rules. Usually someone merged the new network block into the old single-site rules instead of replacing the WordPress section outright. Re-copy the block from Tools > Network Setup, replace the whole section, flush permalinks.

    Subsites load the main site’s content, or core assets 404 with a subdirectory in the path like /site1/wp-includes/js/jquery.js. Constants. Check DOMAIN_CURRENT_SITE and PATH_CURRENT_SITE against the real primary URL, confirm SUBDOMAIN_INSTALL matches the structure the rewrite rules describe, delete any duplicate definitions, then flush permalinks.

    White screen or a 500 straight after saving wp-config.php. PHP syntax, almost always: a missing semicolon or smart quotes from a copy and paste. Nothing renders and the error is in the log, not on screen.

    Network Setup never appeared. The constant is below the stop-editing comment, inside a conditional, or the file never saved because the host would not write it.

    Subdomains do not resolve at all. Missing wildcard DNS, a server that is not configured for wildcard hosts, or a certificate that covers the apex domain and nothing else.

    Network problems are unusually good at pointing at the wrong cause, and the fix often sits in files you reach over SSH rather than in the dashboard. If you would rather hand that over, SiteSelf fixes WordPress errors on request: you describe the symptom in chat, the agent works on the live site, and it reports what it changed and what it checked.

    Plugins, themes and code in a network

    In Multisite, only the Network Administrator installs plugins and themes. A beginner on r/WordPress who selected Multisite during setup by mistake reported the giveaway clearly: there was no Add Plugin button on the site they were working in. They removed the network and reinstalled.

    Installation and activation are separate. A plugin is installed once at network level, then either network-activated across every site or made available for per-site activation. Those are different states, and several plugins built for networks, including WP Multi Network by John James Jacoby, which turns one Multisite installation into several networks, only work correctly when they are network-activated. Activating them per site produces partial behaviour that is hard to read.

    Network Activate link on the Network Admin plugins screen in WordPress multisite
    The Network Admin plugins screen shows distinct ‘Network Activate’ and ‘Network Deactivate’ links, illustrating the unique management states for plugins across a multisite installation. · Source: codex.wordpress.org

    Keep network activation for things every site genuinely needs. Themes work the same way: Network Admin decides what is available, each subsite picks from that list, and the shared stack is the point. Note that the Theme File Editor is restricted in a network by default, which changes how you edit theme files safely.

    If you write custom code for the network, two habits save later pain. Guard multisite-only calls such as switch_to_blog() with is_multisite() so the code does not fatal if it ever runs on a single site. And use home_url() or site_url() in templates rather than hard-coded domains, so mapped domains and per-site URLs resolve correctly.

    Three things people expect to be built in and are not: cross-subsite user access (adding a user to the network does not give them access to every site), search across all sites in the network, and pulling one subsite out into its own install. All three need plugins or custom work.

    Moving a network later

    A Multisite moves as one piece. Site-by-site migration is where these projects die, because shared user tables, per-site media directories, network-level plugins and domain values stored in both the database and the config files all have to land together. When you fix URLs after a move, WP-CLI’s wp search-replace searches through all rows in a selection of tables and replaces the first string with the second. Run it with the network flag so it covers every subsite, and skip the guid column, because rewriting GUIDs causes more trouble than it solves. If tables come out corrupted, wp db repair first, restore from backup if errors persist, and check wp_blogs and wp_site for duplicate entries.

    Frequently asked questions

    Can I switch from subdirectories to subdomains later?

    Not by editing constants. Flipping SUBDOMAIN_INSTALL and the rewrite rules on a live network breaks URLs, routing and internal links. Treat it as a planned migration with search-replace and redirects, and decide the structure deliberately before launch instead.

    Do users automatically get access to every site in the network?

    No. Super Admins see everything; a normal user added to the network still needs a role on each site they should reach. Granting broader access across subsites generally takes a role and capability plugin or custom logic, which catches people out when they assume shared users means shared access.

    Can I run several WooCommerce stores on one network?

    Yes. Each subsite gets its own storefront, products and orders while sharing one codebase and one update cycle. The caveats are host support for Multisite and domain mapping, extensions that are network-aware, and resource use, since checkout traffic on one store shares the server with every other site.

    Can I undo Multisite or pull one site out?

    A network can be reverted to a single site, and extracting one subsite into its own install is possible: export the content, migrate the relevant tables, fix URLs. Neither is quick, and both are easier if you planned the exit before you built the network.

    Does Multisite use more memory because I have thirty idle sites?

    Idle subsites do not each consume the memory of a standalone install. It is one codebase, and a request loads one site. What does cost you is network-activated plugins running everywhere and a database that carries per-site tables for every subsite you create.

    Is Multisite slower than separate installs?

    It depends on the stack more than on Multisite. With persistent object caching, page caching and a plugin set chosen with care, the difference is small. Dozens of subsites with heavy plugin stacks on an underpowered server is a different story, and that is where most complaints come from.

  • How to edit the footer in WordPress safely

    Key takeaways

    • Open the Appearance menu first: an Editor item means a block theme and a Footer template part, while Customize and Widgets point at a classic theme’s footer panels and widget areas.
    • On block themes the footer sits under Patterns or Template Parts depending on the theme, so check both before concluding it is missing.
    • If no dashboard screen changes the text, it is hard-coded in footer.php or printed by a theme credit hook, and the update-safe fix is a child theme copy, not an edit to the parent.
    • Leave <?php wp_footer(); ?> in place immediately before </body>. Delete it and analytics, pixels and plugin scripts stop printing while the page still looks fine.
    • Tracking code belongs in a header and footer snippet plugin such as WPCode, so it survives theme updates and theme switches.

    Most footer edits are one line of text: a stale copyright year, a missing privacy link, a phone number that changed. The edit takes ten seconds once you are in the right screen. Getting to the right screen is the whole job, because WordPress has four systems that can each own the bottom of the page.

    A block theme keeps the footer as a template part in the Site Editor. A classic theme keeps it in Customizer panels, widget areas, or baked into footer.php. A page builder may hold its own footer template. Editing the wrong one is why people say the site “did not save” when it saved perfectly, just somewhere that does not render. The same routing problem shows up whenever you edit themes in WordPress, and the fix is the same: diagnose the layer, then edit.

    How to tell which layer owns your footer

    Log in and look at the Appearance menu. That one menu answers the question in a few seconds.

    • Appearance has an Editor item: a block theme is active. The footer is a template part inside the Site Editor. WordPress.org’s documentation says the Site Editor is only available when a block theme is installed and active, so its presence is a reliable signal.
    • Appearance has Customize and Widgets but no Editor: a classic theme is active. The footer lives in a theme panel in the Customizer, in footer widget areas, or in the theme’s own options screen.
    • A page builder runs the site’s templates: check the builder’s own template or theme-builder area too. Builders sometimes take over the footer and sometimes leave it with the theme, and which one is true decides where you edit.
    • None of those screens contain the text you can see on the front end: the footer is hard-coded in a theme file or printed by a theme credit hook. Skip to the child theme section below.
    WordPress Appearance menu showing the Editor item used to identify a block theme
    The WordPress Appearance menu provides direct access to tools like Customize and Theme File Editor, essential for determining footer ownership. · Source: www.wpzoom.com

    One more check before you start. Look at what you are about to edit and ask whether it is global. A footer template part changes every template that includes it. A widget in Footer 1 changes every page with that sidebar. A block you added to the bottom of a single page template changes that view only. Almost every “it only changed on one page” report is that last case.

    Block themes: edit the Footer template part, not the bottom of a template

    Go to Appearance, then Editor. From there, themes differ in where they file the footer, which is the single most common reason people decide it is missing:

    1. Try Patterns, then look for a Footer entry, often grouped under a heading such as Template Parts or All template parts.
    2. If your version shows Template Parts as its own item, look there instead.
    3. Failing both, open Templates, pick any template such as Index or Single, scroll to the bottom of the canvas and click into the footer area. The block toolbar will name it as a template part, and the three-dot menu gives you an edit option that takes you into the part itself.
    4. From the front end, the admin bar’s Edit Site link drops you into the same editor. Scroll to the footer, hover, and click the edit control that appears.

    Inside the part, edit blocks as you would anywhere else: paragraph text for the copyright line, a Navigation block for footer menus, Social Icons, Site Logo, columns for a multi-column layout. Then save. The save dialog lists what is being written, and for a footer edit it should name the Footer template part. If it lists a template such as Single or Page instead, you edited the template, not the part, and the change will not follow you across the site.

    Spacing and padding are block settings, not footer settings

    There is no “footer padding” control, which sends people hunting for a setting that does not exist. Select the Group block that wraps the footer content, open block settings, and set Styles, then Dimensions, then Padding. Check the mobile preview before saving, because a footer that looks balanced at desktop width often collapses badly at 375 pixels. If the footer is built from nested Columns inside Columns, flattening it to one Group with a few child blocks makes the spacing predictable and easier to debug later.

    Classic themes: the Customizer panel, widget areas, or neither

    Open Appearance, then Customize, and look for a panel with any of these names: Footer, Footer Bar, Bottom Bar, Footer Builder, Site Identity, Theme Options, Site Info or Copyright Text. Theme authors name the same thing a dozen ways. Inside, you are usually looking for a field called Footer Text, Copyright Text or Footer Credits.

    Two things trip people here. First, Customizer changes stay in preview until you click Publish. A change that looks applied in the preview pane and absent on the live site is usually just unpublished. Second, some themes accept shortcodes in that field, commonly [current_year] and [site_title], which means the year updates itself every January instead of going stale.

    For widget-based footers, go to Appearance, then Widgets, and look for areas named Footer, Footer 1, Footer 2, Footer Column or Footer Bottom. Edit the Text or Custom HTML widget that holds your content, or add a Navigation Menu widget for legal links. If the footer area lists no widgets and offers nowhere to add them, the theme does not support footer widgets, and more hunting will not produce one. That is the moment to switch strategy rather than keep clicking.

    If there are several text widgets in the same footer area, make sure you have the right one. Widget IDs such as text-4 and text-5 look identical in the list. Change a word in one, watch the preview, and you will know which instance renders where.

    WordPress Widgets screen showing footer widget areas on a classic theme
    Classic themes often expose footer columns as widget areas, allowing users to easily add and configure content like a Products list directly within the WordPress Customizer. · Source: kinsta.com

    When no screen in the dashboard changes the footer text

    Then it is in the theme’s code. Classic themes keep the closing markup in footer.php, which WordPress’s theme handbook treats as a template partial that other template files pull in. Some themes print credits through an action hook of their own, along the lines of do_action( 'theme_name_credits' ), so the text is not in the file you are reading either.

    Editing the parent theme’s footer.php works right up until the next theme update overwrites it. Use a child theme instead. WordPress’s handbook describes child themes as a way to modify an existing theme without editing that theme’s code, and a copied footer.php in the child folder takes priority over the parent’s.

    1. Take a backup, or make sure your host’s restore point is recent, before you open any PHP file.
    2. Create or activate the child theme.
    3. Copy footer.php from the parent theme folder into the child theme folder, keeping the same filename.
    4. Edit only the human-readable text and HTML. Leave PHP functions, tags and structure as they are.
    5. Upload, then reload the front end.

    The one line you must not remove is the footer hook. WordPress’s function reference describes wp_footer() as firing the action that prints scripts and data before the closing body tag, and plugins rely on it:

    <footer id="site-footer">
        <p>&copy; <?php echo esc_html( date( 'Y' ) ); ?> <?php bloginfo( 'name' ); ?></p>
    </footer>
    <?php wp_footer(); ?>
    </body>

    Delete or relocate that call and the page still renders, which is what makes it nasty. What stops is analytics, tracking pixels, chat widgets and any script a plugin enqueues in the footer. People then spend an afternoon debugging the plugin that is working fine.

    Two failure signatures tell you a PHP edit went wrong: a blank white page, or “There has been a critical error on this website.” With debugging on or in the server error log you will see something like Parse error: syntax error, unexpected ... in wp-content/themes/your-theme/footer.php on line 42. The line number is the fastest route back. Restore your backup, or re-upload the original footer.php from a fresh download of the theme, then redo the change in the child theme.

    If a theme’s footer links are wrapped in eval( base64_decode( '...' ) ), stop. That is a theme hiding its own links from you, and it is a reason to question where the theme came from rather than a puzzle to solve.

    Adding tracking code to the footer without touching the theme

    Scripts are a different job from footer design, and they should not go in footer.php at all. A header and footer snippet plugin stores the code outside the theme, so it survives theme updates and theme switches. WPCode’s listing in the WordPress.org plugin directory describes exactly this: inserting header and footer scripts, pixel code and custom snippets. Install it, open Code Snippets, then Header & Footer, paste into the Footer box, and save.

    Two caveats. The footer box still depends on wp_footer() existing in the theme, so a theme with a mangled footer file makes the plugin look broken. And a heavy third-party script in the footer is still a heavy script: test the page after adding it rather than assuming footer placement makes it free.

    WooCommerce stores have two footers

    On a store, “the footer” is ambiguous. The storefront footer is a theme object and follows the rules above: Customizer panels on a classic theme such as Storefront, the Footer template part on a block theme, and Appearance, then Menus, to assign a dedicated footer menu for terms and privacy links. Some block-and-classic hybrid themes ship both a block footer and a classic footer, and only the active mode shows your edit, which is worth checking before you assume nothing saved.

    The email footer is a separate system entirely. WooCommerce’s settings documentation lists an Emails tab under WooCommerce, then Settings, and the footer text used in customer emails is edited there under the email template options, with placeholders such as {site_title} and {site_url}. For structural changes, copy wp-content/plugins/woocommerce/templates/emails/email-footer.php into wp-content/themes/your-child-theme/woocommerce/emails/email-footer.php and edit the copy. Editing the file inside the plugin folder works until the next WooCommerce update replaces it.

    Check the edit before you call it done

    A footer change touches every page, so verify it like one:

    • Load the home page, one blog post and one other page type. A correct template part edit appears on all of them.
    • Clear the site and host cache, then reload in a private window. Managed hosting caches routinely make a saved change look like a failed one, and re-editing on top of a stale page makes the mess worse.
    • Check the mobile width. Footers break there first.
    • Click the links you touched, including the legal ones.
    • Confirm the footer is still a real <footer> element if you rewrote the markup. Replacing it with a plain <div> removes the landmark that screen reader users rely on to jump there.

    Know the way back before you need it. Site Editor template parts have revisions in the sidebar. Widget content can be pasted back from a copy you kept. File edits come back from the backup you took in step one, which is the step people skip.

    When to stop and get help

    Stop if the footer text is not in any dashboard screen and you are not comfortable working in theme files, if the site is already showing a critical error, or if the credits are obfuscated. Stop also if the request is “change this one line” and the answer keeps turning into FTP access and a child theme, because the cost of the workaround has overtaken the cost of the change. Design changes on an existing WordPress site are the kind of work SiteSelf does through chat, using the connector plugin for content and settings and hosting access for anything in theme files, though pages owned by a visual page builder are refused with the reason.

    Frequently asked questions

    I changed the footer text in the dashboard and the site looks the same. Why?

    Four usual causes. You did not click Publish in the Customizer. You edited a template instead of the Footer template part. Your host’s cache is still serving the old page. Or the theme supports both a block footer and a classic footer and you edited the inactive one.

    How do I remove “Proudly powered by WordPress” from the footer?

    Work through it in order: a footer text or site info field in the Customizer, a theme-specific credit setting, a credit-removal plugin built for your theme, and only then a child theme copy of footer.php. If the theme exposes a credit hook, hook into it and output your own markup instead of deleting the hook call, which can take other output with it.

    Will my footer changes survive a theme update?

    Customizer and theme option values survive updates, though a theme switch loses theme-specific options. Child theme file overrides survive. Parent theme footer.php edits do not. Code stored in a snippet plugin survives both updates and theme switches, which is why tracking code belongs there.

    How do I make the copyright year update itself?

    In a theme footer field, try the theme’s shortcode, commonly [current_year]. In a child theme file, use <?php echo esc_html( date( 'Y' ) ); ?>. In a block theme, a small plugin that provides a dynamic year block drops into the Footer template part without any file editing.

    I edited the dashboard footer text and the public site did not change.

    Those are different systems. The admin_footer_text and update_footer filters change what appears at the bottom of wp-admin only. The public footer comes from the theme’s template part or footer.php.

    Should I disable the Theme File Editor?

    On any site where non-developers have admin accounts, yes. Adding define( 'DISALLOW_FILE_EDIT', true ); to wp-config.php removes the in-dashboard file editor, so footer PHP work has to go through FTP or your host’s file manager, where a backup is part of the routine.

  • How to edit themes in WordPress without losing work

    Key takeaways

    • The Site Editor only appears when a block theme is active. If you see Appearance → Customize instead, you have a classic theme and different instructions apply.
    • Anything saved through the Customizer or the Site Editor is stored in the database and survives a theme update. Anything typed into a parent theme’s files does not.
    • A working child theme needs two files: a style.css whose header includes a Template line naming the parent theme’s folder, and a functions.php that enqueues the stylesheet. Copy only the templates you actually change.
    • WooCommerce overrides load only from a woocommerce folder inside the active theme, at the same relative path and filename the plugin uses.
    • A missing semicolon in functions.php produces a white screen or the critical error page. The fix is reverting the file over SFTP or renaming the theme folder, not more editing in the dashboard.

    A color change made directly in a theme’s stylesheet looks right all afternoon. Then the theme updates and it is gone, along with the spacing fix from last month. Nothing was wrong with the code. It was saved in a file that the update was allowed to replace.

    That is one of two ways theme edits fail. The other is faster and louder: a stray character in functions.php and the site returns a blank page or the message “There has been a critical error on this website.” Both failures come from the same root cause, which is editing in the wrong place for the kind of change being made.

    So the useful question is not “how do I open the theme editor”. It is “which layer does this change belong in”. There are three, and WordPress stores each one differently.

    Check whether your theme is a block theme or a classic theme first

    The instructions for every step below depend on this, and the dashboard tells you in one click. Open Appearance:

    • Appearance → Editor means a block theme is active. WordPress.org’s Site Editor documentation states the Site Editor is only available when a block theme is installed and activated, so its presence is the test.
    • Appearance → Customize means a classic theme, where design settings come from the Customizer and the theme’s own options screens.
    • Appearance → Theme File Editor means file editing is switched on. Many hosts and security plugins remove it, which is not a fault.
    • A builder screen such as Elementor, Divi or Beaver Builder on your pages means a fourth model sits on top of the theme. Edit those pages in the builder; theme templates may not control them at all.

    Most confusing tutorials are confusing because they were written for the other model. A guide that says “go to Appearance → Customize” is describing a classic theme, and on a block theme that menu item does not exist.

    Match the change to the layer that stores it

    Three layers, in order of how safe they are to touch:

    • Settings. Customizer options, theme option screens, Site Editor global Styles. Saved in the database. Survives theme updates. Limited to what the theme exposes.
    • Templates. Block templates and template parts in the Site Editor, or PHP files such as single.php and header.php in a classic theme. This is where layout actually lives. Block template edits go to the database; PHP template edits belong in a child theme.
    • Code. functions.php, hooks and filters. This is where sites break, and where a snippet plugin is usually the better home.

    Before opening anything, write the change as an outcome: “make the mobile header shorter”, not “edit the header file”. Outcomes point at a layer. File names point at whichever file you happened to guess.

    Block themes: Styles for global design, templates for layout

    Open Appearance → Editor and pick the surface that matches the scope of the change.

    1. Styles for site-wide typography, colors, spacing and button styling. Changes here apply everywhere and are the first thing to try.
    2. Patterns and template parts for reusable pieces: the header, the footer, a call-to-action band. Editing the header template part changes every page that uses it.
    3. Templates for the structure of a view: single post, page, archive, search results, 404.
    4. Save, then load one real page in the browser at full width and at roughly 375px wide.
    WordPress Site Editor Styles panel used to edit a block theme
    The WordPress Site Editor’s Styles sidebar offers granular control over global color and typography, defining the visual identity of your block theme. · Source: wordpress.org

    The most common block-theme mistake is a layer mismatch in the opposite direction: editing a page’s content when a template governs the output, then concluding the change “didn’t save”. If the element appears on many pages, it comes from a template part. If it appears on one page only, it is content.

    A child theme of a block theme is usually a folder with a style.css header and a theme.json that overrides specific settings, rather than a pile of copied PHP.

    Classic themes: the Customizer, then Additional CSS, then stop

    Start at Appearance → Customize and look for the setting that matches the outcome: Site Identity for the logo, Colors, Menus, Widgets, Homepage Settings, plus whatever panels the theme adds. Anything you set here is update-safe.

    Appearance → Customize → Additional CSS is the right home for presentation tweaks the markup already supports: a button color, a font size, tighter spacing. It is stored in the database, it is easy to remove, and for a handful of rules it beats building a child theme.

    Additional CSS stops being the answer when you are fighting specificity to move things around. If you are stacking !important to rebuild a header, the markup cannot produce the layout you want. At that point the honest options are a child theme template, a different theme, or a developer. More CSS just makes the next person’s job harder.

    If the change is clear but you would rather not be the person hunting for the template, design changes on an existing theme are the kind of work SiteSelf does through chat, using the SiteSelf Connector plugin for settings and hosting access for theme files.

    How to build a child theme with two files

    A child theme gives code-level changes a place to live that updates will not overwrite. WordPress loads the child’s version of a template or stylesheet in preference to the parent’s. The theme handbook’s steps come down to a folder and two files.

    The two files

    Create a folder in /wp-content/themes/, for example company-child. Inside it, create style.css:

    /*
    Theme Name: Company Child
    Template: twentytwentyfive
    Version: 1.0.0
    */

    The Template value is the parent theme’s folder name, not its display name. “Kadence Pro” on screen might be kadence on disk. Check /wp-content/themes/ and copy the folder name exactly, including case.

    Then functions.php, which loads the child stylesheet after the parent’s:

    <?php
    add_action( 'wp_enqueue_scripts', function() {
        wp_enqueue_style(
            'company-child-style',
            get_stylesheet_uri(),
            array( 'parent-style-handle' ),
            wp_get_theme()->get( 'Version' )
        );
    } );

    Replace parent-style-handle with the handle the parent uses; search the parent’s functions.php for wp_enqueue_style to find it. Declaring the dependency is more reliable than an @import in the stylesheet, because WordPress then controls load order. Some parent themes, Divi among the ones practitioners complain about most, will render badly if the child does not load parent assets correctly, so check the parent’s own child theme notes before assuming the snippet above is enough.

    wp-content themes directory showing a WordPress child theme folder
    This SFTP client view clearly illustrates the essential wp-content/themes directory where all WordPress themes, including child themes, reside. · Source: www.theistudio.com

    Copy only what you change, at the exact same path

    Do not copy the parent’s entire functions.php into the child. It runs in addition to the parent’s, so duplicated function names produce a fatal error immediately. Copy only the code you need.

    Template overrides work on path matching. If the output you want to change lives in template-parts/post/content.php, the child needs that same relative path, or WordPress keeps using the parent file and your edit does nothing. A misplaced override looks exactly like a caching problem.

    Activate the child from Appearance → Themes, then load the homepage, a single post, an archive and a normal page. Any theme options set on the parent will need to be set again, which is a good reason to build the child theme before you spend an afternoon in the Customizer.

    Put small features in a snippet plugin instead of functions.php

    For hooks, filters and small behavior changes, a snippet plugin is safer than a theme file. Code Snippets, in the WordPress.org plugin directory, describes itself as a way to stop tweaking your theme’s functions.php and to add code as individual, manageable snippets.

    The practical advantage is recovery. Each snippet can be switched off from the plugin’s own screen, or through recovery mode, without SFTP. Add one snippet at a time and load the site after each. The division most practitioners settle on: snippet plugin for functionality, child theme for structure and layout.

    The limit is real. A bad snippet can still take the front end down, and a snippet plugin used as a dumping ground for hundreds of lines becomes its own unmaintainable mess. Database or environment-specific logic belongs in a small custom plugin, not in either place.

    WooCommerce: the shop page is not a page

    Editing the Shop page’s content and seeing nothing change is the single most common WooCommerce theme question. The shop layout comes from a product archive template, not from that page’s content.

    Three routes, cheapest first:

    • On a block theme, edit the Product Catalog or archive template in Appearance → Editor → Templates.
    • On a classic theme with WooCommerce options, use the theme’s own settings. Astra, Blocksy and Kadence each expose product catalog controls in the Customizer.
    • Override the template. WooCommerce’s developer docs describe copying the template into a woocommerce folder inside your theme, keeping the same directory structure, and editing the copy.

    Overrides fail on precision, not concept. The relative path and filename must match the plugin’s exactly, the theme holding the override must be the active theme, and the output you are chasing may come from several templates plus action hooks, so changing one file may not be enough. Removing markup or hooks that WooCommerce expects is how add-to-cart and checkout break, so test an actual purchase after any override. Store owners who want this handled without touching template files can read about WooCommerce work through chat.

    If the screen goes white after a PHP edit

    The white screen and the “critical error” page are both documented in WordPress’s Common WordPress errors handbook, and a PHP error in functions.php is the usual cause after theme editing. WordPress also emails the admin address with a recovery mode link, subject line “Your Site is Experiencing a Technical Issue”. Check that inbox first.

    WordPress critical error message after a functions.php edit
    This critical error message, displayed in your browser, signals a fatal PHP issue that often requires SFTP access to resolve. · Source: www.wpbeginner.com

    Work in this order and stop when the site returns:

    1. Revert the file. Over SFTP or your host’s file manager, remove the code you just added or restore your saved copy. Do not keep editing in the dashboard; if /wp-admin goes down too, that route closes.
    2. Rename the theme folder. Change my-theme to my-theme-old in /wp-content/themes/. WordPress falls back to a default theme such as Twenty Twenty-Five. If the site comes back, the fault is in the theme.
    3. Read the error. Set WP_DEBUG and WP_DEBUG_LOG to true in wp-config.php and open wp-content/debug.log. It names the file and the line.
    4. Reinstall the theme. If the file looks corrupted, upload a fresh copy of the parent theme. Your customizations are in the child theme, which is the point of having one.

    Get help when the error persists after the theme is ruled out, when you have no SFTP or file manager access, or when the site takes orders and every minute of a blank checkout costs money. Guessing is more expensive than asking.

    What to check before you call the edit done

    “Saved” is not “working”. Run through this after any theme change:

    • Clear the caching plugin, the host cache, the CDN and your browser, in that order, before believing the change did not apply.
    • View the change at a narrow width. Headers, tables, long headings and forms are where mobile breaks.
    • Load every view the edited template touches: post, page, archive, search results, pagination, and one page while logged out.
    • On a store, load a product, add to cart and reach checkout.
    • Note what you changed, where, and how to undo it. A one-line record beats memory three months later.
    • Recheck after the next parent theme update, particularly if you overrode a template.

    Visual settings in the visual tools, durable overrides in a child theme, functionality in a snippet plugin, nothing in the parent theme. That split is what keeps an update from erasing your work.

    Frequently asked questions

    Why is Appearance → Customize missing from my dashboard?

    You are almost certainly running a block theme, where the Customizer is replaced by the Site Editor at Appearance → Editor. Some themes hide parts of the Customizer too. If neither menu item appears, check which theme is active under Appearance → Themes.

    Why can’t I find the Theme File Editor?

    Many hosts and security plugins disable file editing from the dashboard, and multisite installs restrict it by default. It can also be off because file permissions do not allow writes. Use SFTP or your host’s file manager instead; that is the better workflow anyway, since it lets you keep a copy of the original file.

    Do I need a child theme, or is Additional CSS enough?

    For colors, fonts and spacing that the existing markup supports, Additional CSS is enough and it survives theme updates. For template changes, PHP, or anything structural, use a child theme. Developers disagree about the middle ground; a few dozen CSS rules do not need a child theme, but a growing pile of overrides does.

    My edits do not show up on the site. What now?

    Clear site, CDN and browser caches first. Then confirm you edited the template the page actually uses, since a page may render from front-page.php rather than page.php, or from a block template rather than page content. If the CSS is loading but losing, the parent rule is more specific, and if a page builder owns the page, the theme template may not be in play at all.

    Where are WordPress theme files stored?

    In /wp-content/themes/your-theme-name/, reachable over SFTP or through your host’s file manager. Practitioner advice across r/webdev is blunt about the rest: /wp-admin and /wp-includes are off limits, and plugin files should be overridden rather than edited in place.

    Can SiteSelf edit pages built with Elementor or Divi?

    No. Pages owned by a visual page builder are refused at the moment of work, with the reason given, because the builder holds the layout rather than the theme templates. Theme-level styling, templates and code on a standard theme are in scope, given the right access.

  • How to build a landing page in WordPress

    Key takeaways

    • A landing page in WordPress is a Page plus four decisions: template, slug, index setting, and what loads on the page. Nearly every failure traces back to one of them, or to a cache sitting in front of them.
    • Block themes: build a Landing page template in the Site Editor with the header and footer removed, then assign it in the page’s Settings sidebar. Classic themes: pick the full-width or canvas template, or add a template file in a child theme.
    • After you change a slug, open Settings and then Permalinks and press Save Changes to flush rewrite rules, then check that no live ad or menu item still points at the old URL.
    • A per-page Index setting does nothing while the SEO plugin still has a site-wide noindex rule on Pages. Check both.
    • Test the form on the published URL in a logged-out browser. A form that fails silently looks exactly like traffic that did not convert.

    WordPress has no landing page object. There is no dedicated post type, no setting to switch on, no feature to install. A landing page is an ordinary Page, and four decisions make it act like a landing page: the template that renders it, its slug, its indexing settings, and what CSS and JavaScript load on it.

    That framing is worth holding onto, because it also describes every way the page fails. Blank page, wrong layout, 404, missing from Google, form that does nothing: each one is a template problem, a permalink problem, an indexing problem, an asset problem, or a cache sitting in front of one of those. Fix the category and the symptom goes away.

    Decide what renders the page before you place a single block

    This is the decision that sets the ceiling on everything else. A landing page built with the block editor and a stripped template loads the theme’s stylesheet and whatever the blocks need. The same page built in a full page builder also loads the builder’s own CSS and JavaScript, on every request, whether the page uses three of its widgets or thirty.

    That overhead is not fatal. It is a real cost that shows up on the metric advertisers care about. web.dev’s Largest Contentful Paint guidance puts the “good” threshold at 2.5 seconds, measured at the 75th percentile of page loads, which is a low bar to clear on a laptop and a high one on a phone on mobile data.

    Three honest options:

    • Block editor plus a custom template. Free, lightest, no extra plugin. You need to be comfortable in the Site Editor, and you get no prebuilt campaign templates and no built-in split testing.
    • A page builder you already use across the site. Fastest to produce, easiest to hand to a marketer, and the standard choice if you publish campaign pages regularly. Adds page weight and one more thing that can conflict after an update.
    • A second builder, just for landing pages. Usually the worst of both. Two builders on one site means two asset stacks, two sets of update risk, and two ways to edit the same page.

    Pick one and stay with it. Overlapping tools doing the same job is the most reliable way to create a conflict you will spend an afternoon isolating.

    Build the page: block theme, classic theme, or a template file

    Block theme (Twenty Twenty-Four and similar)

    The Site Editor is only available when a block theme is active, according to WordPress.org’s Site Editor documentation. If Appearance shows an Editor item, you have one.

    1. Go to Appearance, then Editor, then Templates, and add a new template for Pages. Name it something obvious, like Landing page.
    2. Delete the Header and Footer template parts from it. Keep the Content block. That is your distraction-free shell, reusable for every campaign.
    3. Create the Page under Pages, then in the Settings sidebar set Template to Landing page. The Settings sidebar is the standard place WordPress exposes per-page controls in the block editor.
    4. Build the page in the content area with ordinary blocks: Cover or Group for the hero, Columns for benefits, an image or two, your form block.
    WordPress Site Editor templates list used to create a landing page template
    Within the WordPress Site Editor, easily manage existing templates or add new ones, including a blank page for a custom landing page without a header or footer. · Source: www.gravityforms.com

    Classic theme

    Open the Page, and in the Settings sidebar look for Template. Most classic themes ship something called Full Width, Blank, Canvas or Page Builder. Pick it, then hide anything the theme still prints, usually through the theme’s own page options.

    If the theme has no suitable template, add one in a child theme rather than editing the parent. A parent theme update will overwrite your file and take the design with it. A minimal blank template looks like this:

    <?php
    /* Template Name: Landing page */
    ?>
    <!doctype html>
    <html <?php language_attributes(); ?>>
    <head><?php wp_head(); ?></head>
    <body <?php body_class(); ?>>
    <?php while ( have_posts() ) : the_post(); the_content(); endwhile; ?>
    <?php wp_footer(); ?>
    </body>
    </html>
    

    Save it as landing-page.php in the child theme. Keeping wp_head() and wp_footer() matters: drop them and your analytics, your form scripts and half your plugins stop loading on exactly the page you care about.

    What goes on the page

    The structure practitioners keep landing on is boring and stable: hero, the problem, the offer, no more than three feature sections, proof, objections, a repeated call to action.

    The hero carries one H1 that echoes the ad or email that sent the visitor, one sentence of plain value, and one button. If the ad promised a free quote, the H1 says so. Proof goes after the benefits, not before, because a testimonial only reduces friction once the reader knows what is being offered. Named people with specific outcomes do more than a wall of anonymous “verified customer” quotes.

    Keep one goal and one primary action. A second offer on the page is a second decision, and second decisions are where conversion goes to die.

    The settings that decide whether the page works

    Design is the part everyone looks at. These four are the part that breaks.

    Slug. Short, campaign-aware, and unique. Check it does not collide with a plugin’s base, like /shop/, /docs/ or /kb/. If it does, change the plugin’s base in its settings rather than renaming the page a second time.

    Indexing. Campaign pages fed only by ads can be set to noindex. Pages you also want found in search must be set to Index, with the canonical URL pointing at themselves, not at the homepage. Then check the SEO plugin’s site-wide settings, because a global “noindex Pages” rule quietly overrides the per-page fix you just made.

    Navigation. Keep the page out of the main menu when traffic comes from ads or email. For a page that also serves organic search, a minimal header is a fair trade. For B2B offers, a single link to pricing or docs often costs less than the friction of hiding it.

    The thank-you page. Create a separate page shown after submit, set the analytics goal on that URL, and tag campaigns with UTM parameters so you can compare channels. Without a distinct URL you are guessing which source produced which lead.

    WordPress Permalinks settings screen used to flush rewrite rules after a landing page slug change
    Simply clicking the Save Changes button on the Permalink Settings screen can refresh rewrite rules, resolving many 404 errors on landing pages. · Source: www.geeksforgeeks.org

    Check these before you send traffic

    1. Open the published URL in a logged-out browser, not the editor preview. Template problems and cache problems only show up there.
    2. Submit the form yourself. Confirm the entry arrives, the notification email arrives, and the thank-you page loads.
    3. Load it on a phone on mobile data. Check the CTA is reachable without pinching and the hero image is not a 2 MB JPEG.
    4. Confirm exactly one H1, descriptive button text (“Book a call”, not “Learn more”), and enough contrast on the button to read it outdoors.
    5. Purge every cache layer you run: the caching plugin, the host cache, the CDN. Then reload.
    6. Check the page in Search Console’s URL Inspection if it is meant to be indexed.

    Do this again after any change to the page, not just at launch. Most silent landing page failures start with an edit that was never checked on the live URL. If keeping that loop going is the part that never happens, it is the kind of work you can hand to an agent that edits pages and reports back.

    When the page is blank, 404s, or the form does nothing

    Ranked roughly by how often each one turns out to be the cause.

    Blank page or “There has been a critical error on this website”

    Almost always a plugin or theme conflict, and almost always right after an update. Work in staging if you have it. Deactivate all plugins, then reactivate one at a time, refreshing the landing page after each. On a site with twenty or thirty plugins, halve the set instead of going one by one.

    To avoid taking the live page down while you test, the Health Check & Troubleshooting plugin from WordPress.org disables plugins for your session only. Note the caveat on its directory listing: WordPress.org flags that it has not been tested with the latest three major releases, so check it on staging first. If you are locked out of the dashboard entirely, rename the plugins directory over SFTP to get back in, then turn WP_DEBUG on in wp-config.php and read the fatal error instead of guessing.

    The page 404s

    Go to Settings, then Permalinks, and press Save Changes without altering anything. That flushes rewrite rules and fixes most cases. If it does not, your .htaccess or Nginx config is not writable and rules are never being written. Then check what still points at the old URL: menu items, internal links, and live ad campaigns, which will keep spending on a 404 until someone notices.

    Your edits do not show up

    Cache, in one of three places. Clear the plugin cache, the host cache and the CDN, in that order, and retest in a private window. Host-level caching is often not configurable from the dashboard, so a correct exclusion in your caching plugin can still be defeated by the server. If edits keep going stale on this one page, exclude the page itself from caching.

    The form submits and nothing happens

    Open the browser console with F12 and watch for JavaScript errors as you submit. The usual causes: a security plugin blocking the AJAX endpoint the form uses, minification or JavaScript deferral changing script order, or mixed content on a page still loading an asset over HTTP. Inside a page builder, using the form plugin’s shortcode instead of its widget removes a whole class of these problems. Turning off JavaScript optimization site-wide to make one form work is a bad trade: exclude that script instead.

    Browser console showing a JavaScript error while testing a WordPress landing page form
    When a form fails to respond, the browser console often reveals an ‘Uncaught TypeError’ pointing directly to the problematic script and line number. · Source: learn.microsoft.com

    WooCommerce pages

    A product landing page should use the Product post type, or a normal Page with WooCommerce blocks or the [product_page id="123"] shortcode. A Page with product copy pasted in has no cart integration. Cart, checkout and account endpoints must stay out of every cache layer, including the host’s. A cached checkout is a revenue failure that looks fine from the outside.

    When to stop and get help

    Stop when the fix requires editing files you cannot restore, when the error is a PHP fatal inside a plugin you did not write, or when the site is taking live ad traffic and you are more than half an hour into isolating a conflict. Roll back to the last backup, point the campaign at a working URL, and debug on staging. Firefighting on production with ad spend running is how a small problem gets expensive.

    Frequently asked questions

    Do I need a plugin to make a landing page in WordPress?

    No. The block editor plus a full-width or blank template covers simple lead-gen pages, and you only really need a form plugin and an SEO plugin on top. Builders earn their place when a non-technical team needs prebuilt templates, or when you want split testing without custom work.

    Can my homepage be a landing page?

    Yes. Go to Settings, then Reading, choose “A static page” and select your page. Do not set the same page as both the homepage and the Posts page, which makes WordPress render blog posts instead of your layout.

    Should a landing page have navigation?

    For pages fed by ads or email, remove it. For pages that also need to work in organic search, a minimal header is reasonable. For considered B2B purchases, keeping one link to pricing or docs usually costs less than the friction of hiding everything.

    How many landing pages should I run?

    One per offer, campaign or audience segment, each with its own URL and its own tracking. One generic page serving four campaigns gives you no way to tell which message worked.

    Should I use a dedicated landing page tool instead of WordPress?

    External tools launch faster and ship testing out of the box, at the cost of a separate subdomain, a separate bill and a split content footprint. A common compromise is to test paid-campaign variants outside the site, then rebuild the winner inside WordPress on your own domain where the SEO value accumulates.

    Will a WordPress landing page rank?

    It can, if it is indexable, canonical to itself, fast on mobile, and says something substantial rather than repeating a slogan four times. Thin pages built purely for ad traffic rarely rank, whatever platform they sit on.